How do I draw the single-line diagram of my existing installation myself, for example before selling my home?
Existing installation without plans? Survey the board, circuits and rooms yourself, draw the single-line diagram and situation plan for free in PlanElec Sketch and know what your electrician adds, with AREI/RGIE references.
 AuthorStephan Behm
Yes, you can survey the current state of your installation and draw it yourself as a single-line diagram with a situation plan: read the distribution board, switch circuits off one by one to identify them, walk through the rooms and draw everything for free in PlanElec Sketch. What you cannot see for certain without opening the board, above all cable type, cross-section and installation method, you mark as open and have your electrician complete. The plans show what is there; whether the installation complies is established by the accredited inspection body.

Status 7 November 2026, AREI/RGIE Book 1 version 07 (in force since 1 November 2026). The AREI (Dutch) and RGIE (French) are the Belgian general regulations on electrical installations; the inspection is often called the keuring. Written by the PlanElec team, which builds Sketch and Pro.
When do I need a single-line diagram of my existing installation?
Three occasions are typical:
| Occasion | What the AREI/RGIE says | What you need |
|---|---|---|
| Selling a house or flat | Inspection visit when an old installation is sold (sub-section 8.4.2.2 a); if the plans are missing, this is recorded as a violation in the report (sub-section 8.4.2.2 d) | Single-line diagram and situation plan of the current state |
| Minor alteration, such as one more socket | No new single-line diagram needed; a short, dated and signed description is enough, and the situation plan shows the change (sub-section 3.1.2.1 a) | An up-to-date plan to add the change to |
| Substantial alteration or extension | The person responsible for carrying out the work draws single-line diagrams and situation plans (sub-section 3.1.2.1 a), followed by a conformity inspection | Your survey as the starting point for the electrician |
At a sale, the inspection body carries out the inspection even without plans. Its representative then writes a short description of the boards and a rough sketch. These documents may not be used as the single-line diagram and situation plan, and the missing plans are recorded as a violation in the report (sub-section 8.4.2.2 d). The other rules for a sale are covered in Electrical dossier when selling a property.
Am I allowed to draw the diagram of my own installation?
For a new installation or a substantial alteration, the person responsible for carrying out the work draws the plans; their name, capacity and, where applicable, VAT number appear on them (sub-section 3.1.2.1 a). For the current state of an old installation at a sale, sub-section 8.4.2.2 d requires plans to be available; it does not say who draws them. So ask your inspection body before the appointment whether it accepts a survey you drew yourself, and have an electrician complete the open data.
Your share is the legwork: finding rooms, sockets, light points and switches and assigning each to a circuit. That saves the electrician time on site. Both routes are costed in Drawing the single-line diagram yourself vs. hiring an electrician.
What must the single-line diagram of a home show?
Sub-section 3.1.2.2 a sets the minimum content. The table shows what you can record reliably yourself and what stays open:
| Item under sub-section 3.1.2.2 a | Where to find it | Can you record it? |
|---|---|---|
| Type and characteristics of residual current devices (RCDs) | Printed on the front: rated current, 30 mA or 300 mA, type A or AC | Yes, usually readable |
| Type and characteristics of circuit breakers and fuses | Printed: for example C16, B20, C32; rating on the fuse link | Yes, usually readable |
| Sockets, light points, switches | Switching off and walking through the rooms | Yes |
| Fixed appliances (hob, water heater, heat pump …) | Switching off, the appliance's rating plate | Yes |
| Sources (solar inverter, battery) | Rating plate, installation documents | Partly |
| Junction and branch boxes | Only visible where accessible | Partly |
| Cable: type, cross-section, number of conductors | At the terminals inside the board, in the box | No, only with the board open – electrician |
| Installation method | Concealed, in conduit, surface-mounted | Partly; leave open if in doubt |
Sub-section 3.1.2.1 a adds the installation address, voltage and type of current, a capital letter per circuit and the numbering of points in order from the protective device. Parts whose installation began before 1 October 1981 are marked "older part" on the diagram. Every diagram carries a number, a version and the date of that version (section 3.1.2). What the symbols look like is shown in AREI electrical symbols.
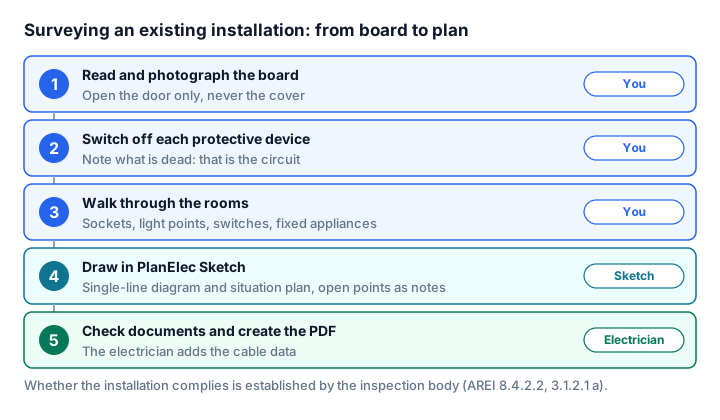
How do I survey the board without taking risks?
Open only the door of the distribution board, never the cover over the terminals. Behind it are live parts; only an electrician works there.
- Photograph the front. Each row separately, sharp enough to read the markings. Photograph any existing labels next to the breakers too.
- Note the order. From the supply through the main switch or main RCD to the group RCDs and the circuit breakers below them. This chain is the backbone of your diagram.
- Read the values. On the RCD: rated current, tripping current (for example 300 mA or 30 mA) and type; on the circuit breaker: curve and rated current, such as C16.
- Look for sub-boards. A garage, attic or cellar often has its own small board. It is fed from an outgoing circuit of the main board and gets its own section in the diagram.
How do I find out which socket is on which circuit?
Switch the circuit breakers off one at a time and walk through every room. Whatever is dead belongs to that circuit. A socket tester or a small lamp is quicker than switching on every appliance.
- Tell the household before you switch off; think of the freezer, router and heating.
- Note per room: sockets (a single or multiple socket outlet counts as one point), light points, switches and fixed appliances.
- A light point with two switches is a two-way circuit; which switch type belongs on the diagram is explained in One-way, two-way or intermediate switching.
- If a point stays live with every breaker off, or a breaker feeds nothing you can find, note it as open. The electrician will sort it out.
You end up with a list "circuit → points per room". It is the basis for both plans: the single-line diagram shows the electrical chain, the situation plan the position in the room. The difference is explained in Single-line diagram vs. situation plan.
How do I draw the existing installation in PlanElec Sketch?
Sketch is free, runs in the browser and needs no account for drawing. For your survey, Sketch is enough; you do not need Pro.
- Open Sketch with the task ‘Draw the documents for the inspection’. The drawing starts with the connection, meter and main protection.
- In the Single-line diagram area, add your RCDs at the blue connection point, then the circuit breaker and loads for each circuit. Sketch assigns circuit letters and numbers automatically, in order from the protective device. A sub-board is placed from the library onto the cable of its outgoing circuit.
- Anything you do not know goes on the diagram as a note or free text, for example "cross-section open – electrician". That way no gap gets lost.
- In the Situation plan area, create a floor per storey (Add floor) and drag the devices from the diagram to their place. With a free account you upload a floor plan as an image or PDF as the background; without an account you draw walls and rooms yourself.
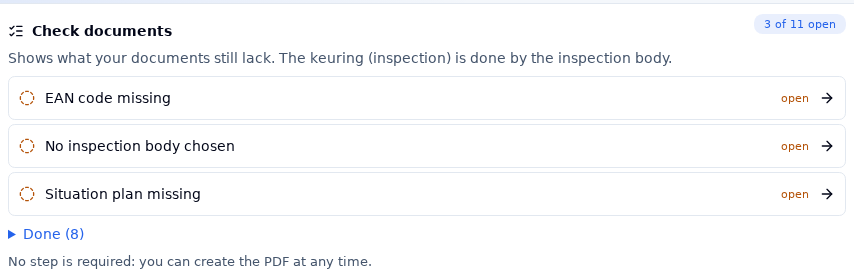
- Under Document → Document data, enter the installation address, the customer and the inspection body.
- In the Print area, Check documents shows what is still missing and jumps to the spot. Then Create PDF.
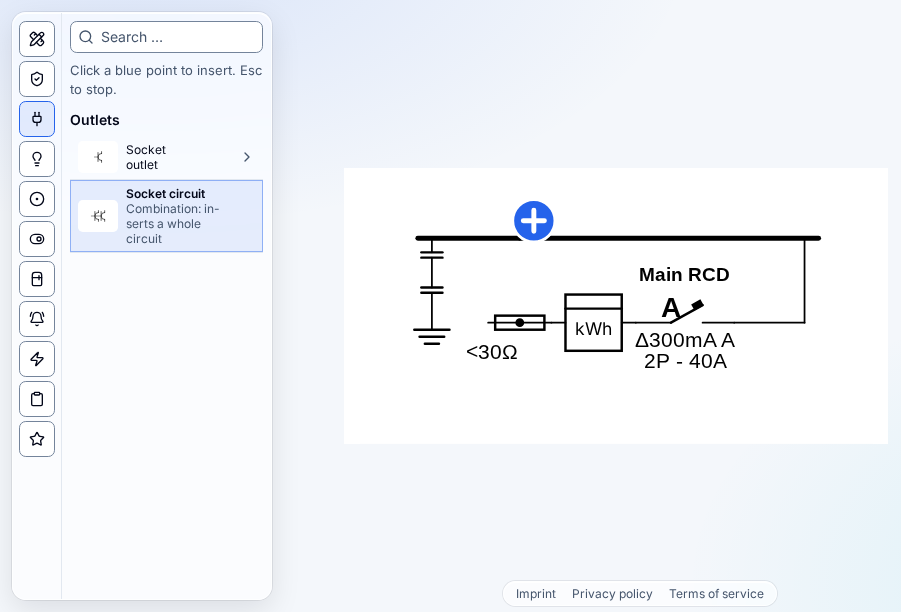
Without an account, the drawing stays in your browser; save it as a file as well. With a free account it is stored in the cloud and available on every device; without Pro, an account holds up to three locations. Without an account the PDF carries a logo watermark; a free account removes it. All limits are on the pricing page.
What does the electrician add, and what does the inspection body check?
| Task | You | Electrician | Inspection body |
|---|---|---|---|
| Record rooms, points and the assignment to circuits | ✓ | checks | |
| Read the protective devices from the front | ✓ | checks | |
| Add cable type, cross-section, number of conductors, installation method | ✓ | ||
| Fix faults noticed during the survey | ✓ | ||
| Inspection visit, measurements, report | ✓ | ||
| Sign and date the plans on conformity (new installations and substantial alterations, sub-section 3.1.2.1 a) | ✓ | ✓ |
Give your electrician the PDF or the Sketch file. With PlanElec Pro, the drawing is taken over with Take it to Pro, and the board and self-check report are planned there; how the handover works is explained in Introducing PlanElec Sketch. For you as the owner, Sketch costs nothing.
Which mistakes happen most often during a survey?
- A multiple socket counted twice. A double or triple socket outlet is one point. For the rule of eight sockets per circuit see How many sockets per circuit?.
- A sub-board overlooked. A second enclosure in the garage or cellar belongs on the diagram with its outgoing circuit and on the situation plan with its location (sub-section 3.1.2.3 a).
- Circuit letters missing on the situation plan. Every point on the plan carries the letter and number from the diagram (sub-section 3.1.2.1 a). Sketch carries them over automatically when you drag the devices from the diagram onto the plan.
- Guessed values. An estimated cross-section on the plan is worse than "open". Write only what you have read.
- Older parts not marked. Parts from before 1 October 1981 are marked "older part". The special rules for old installations are covered in Old buildings and AREI part 8.
What if the inspection is still negative?
A negative report lists violations; at a sale, the buyer has 18 months from the deed of sale to have them corrected, followed by a new inspection visit (sub-section 8.4.2.2 a). Your survey is then the basis for the corrections: the electrician adds the changes, and the updated plan goes to the new inspection. How to read the report is explained in Electrical inspection failed – what now?.
Sketch or Pro: what do you need?
| Your situation | Tool |
|---|---|
| Owner surveying the existing installation for a sale or inspection | Sketch, free |
| Adding a small change to an existing plan | Sketch |
| Electrical contractor who needs the board and a self-check report | Pro, taken over from Sketch |
| Several client projects in a team, with read access for fitters | Pro |
As an owner, you stay with Sketch. Pro is meant for businesses that plan complete installations; what it adds is shown on the PlanElec Pro product page.
Limits of this guide
Sketch checks no AREI/RGIE rules and measures nothing. It draws what you enter. Insulation resistance, earthing and RCDs are verified only by the measurements of the accredited inspection body. Do not open covers and do not work on live parts. A plan you surveyed yourself does not replace professional design for an extension.
Official source and further reading
- FPS Economy: General regulations on electrical installations (RGIE), Book 1, French version – section 3.1.2, sub-sections 3.1.2.1 a, 3.1.2.2 a, 3.1.2.3 a and 8.4.2.2
- Creating a single-line diagram step by step
- Drawing a situation plan: guide
- Renovation and electrical plans
- Electrical dossier when selling a property
Draw your existing installation for free in PlanElec Sketch →
Draw the documents for the inspection
PlanElec Sketch starts with the supply and the main protection; you draw the rest. Result: single-line diagram and situation plan. The inspection itself is carried out by the accredited inspection body.
Fictitious sample dossier, available without sign-up.